Overview
This guide walks you through rebranding the entire DayOneMart solution as your own — the web storefront, the admin panel, and both Flutter apps. It is organized so a store owner can complete the web sections without touching code, and the app sections give exact file paths and commands for whoever builds your mobile apps.
- Logos & identity — business name, logo, favicon, app name, app icons
- Colors — brand colors for the storefront, admin panel, and both apps
- Content — banners, policy pages, onboarding text, translations, email templates
Where Everything Is Set
One reference table for every brand asset across the three products:
| Brand asset | Web (storefront + admin) | Customer App | Deliveryman App |
|---|---|---|---|
| Name | Admin Panel → Settings → Business Setup → Basic Info | android:label in AndroidManifest.xml; CFBundleName in Info.plist |
Same files in the Deliveryman App project |
| Logo | Business Setup → Logo upload | Replace image assets in assets/images/ |
Replace image assets in assets/images/ |
| Favicon / app icon | Business Setup → Icon upload | flutter_launcher_icons or the mipmap-* / AppIcon.appiconset folders |
Same approach |
| Primary / secondary color | Business Setup → Admin Primary & Secondary Color (hex) | lib/config/theme/ |
lib/config/theme/ |
| Content pages (About, Terms, Privacy…) | Admin Panel → Website Setup / page builder | Fetched from the API — edit once in the admin panel | Fetched from the API — edit once in the admin panel |
| UI text / translations | lang/ + AdminPanel/locales/ + StoreFront/locales/ |
lib/l10n/arb/app_*.arb |
lib/l10n/arb/app_*.arb |
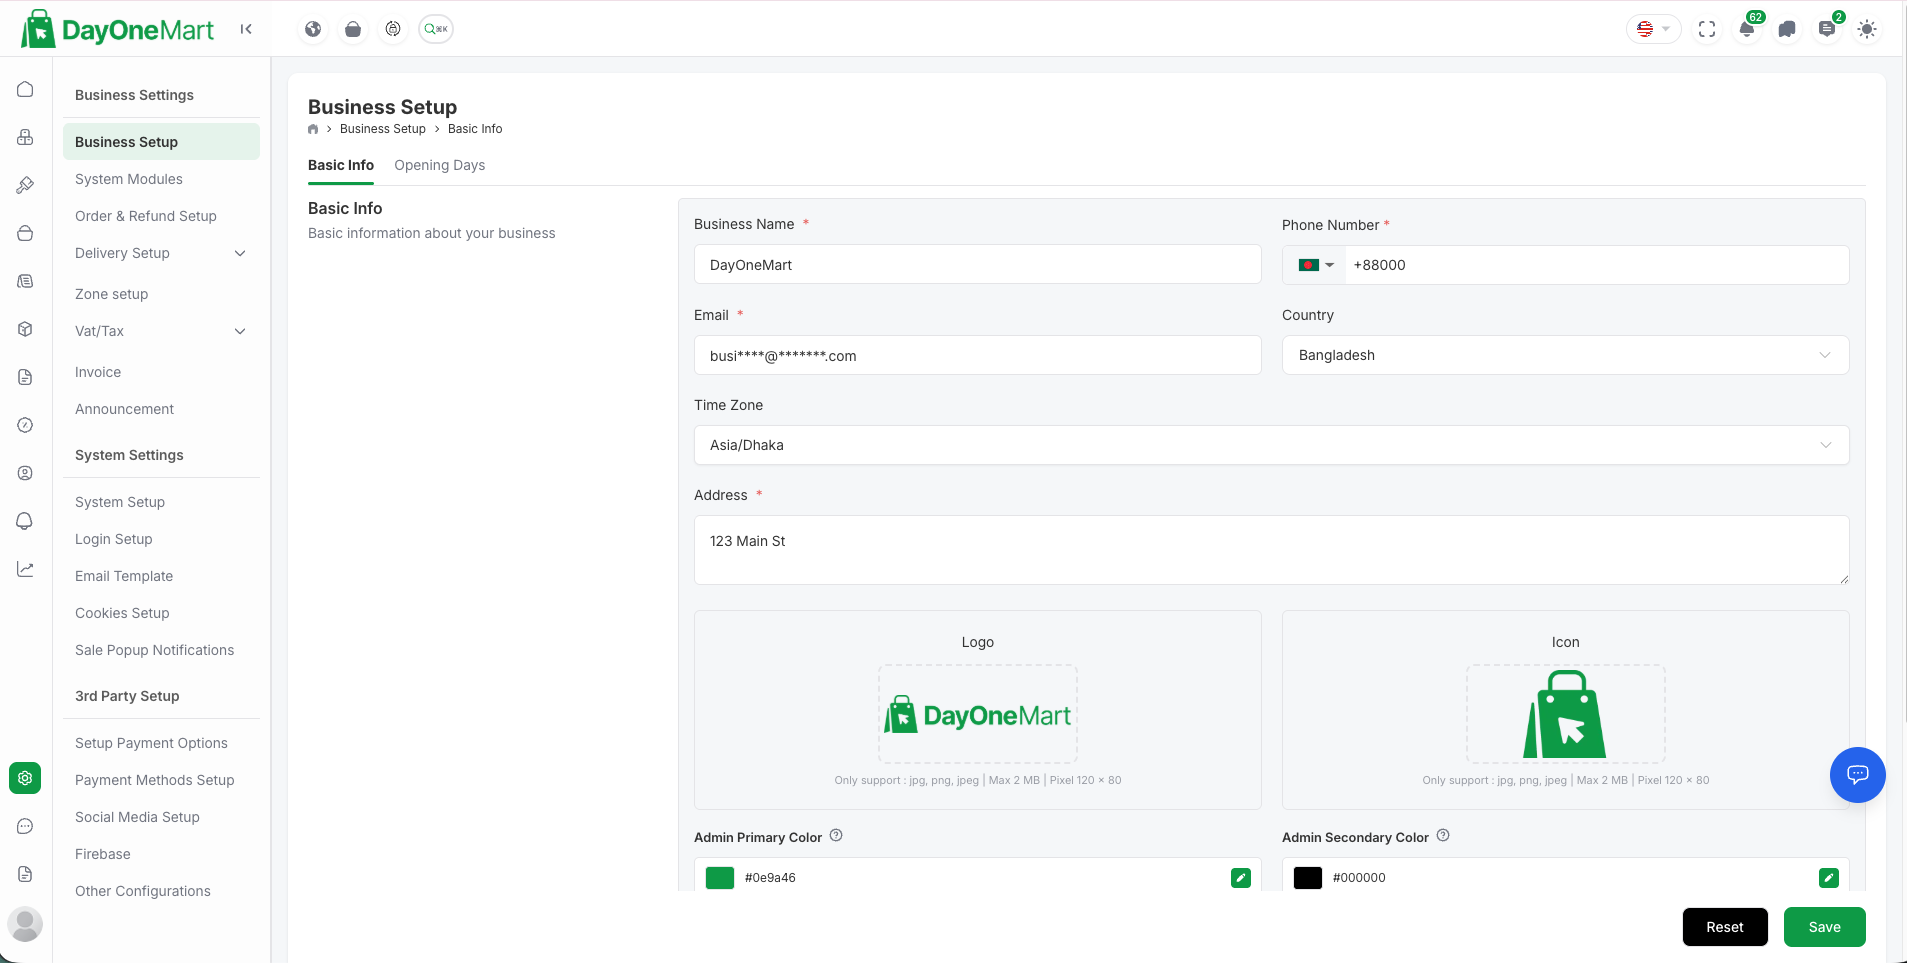
Web — Business Name, Logo & Colors (No Code)
 1
2
3
4
1
2
3
4
Fields on this screen
- Business Name — shown in the storefront header, emails, and browser title.
- Logo — the main brand logo (JPG/PNG, max 2 MB, ~120 × 80 px).
- Icon — the favicon shown in the browser tab.
- Admin Primary & Secondary Color — accent colors used across the UI.
Step-by-Step
-
Log in to the Admin Panel Use the administrator account created during installation, then open Settings → Business Setup → Basic Info.
-
Set the Business Name Type your store name. It appears in the storefront header and footer, the browser tab title, invoices, and every transactional email.
-
Upload your Logo Click the Logo upload field and choose a transparent PNG (~300 × 80 px works well). Transparent backgrounds look correct in both light and dark headers. Keep the file under ~200 KB for fast page loads.
-
Upload your Icon (favicon) Choose a square PNG (512 × 512 px recommended). This becomes the browser-tab icon for the storefront and admin panel.
-
Set the Primary and Secondary colors Enter your brand's hex values (e.g.
#0EA5E9). These drive buttons, links, badges, and highlights across the storefront and admin panel. -
Save Changes apply on the next page load — no rebuild, redeploy, or cache clear needed.
| Asset | Where it appears | Recommended size | Format |
|---|---|---|---|
| Main logo | Storefront & admin header | ~300 × 80 px (transparent) | PNG / SVG |
| Favicon | Browser tab | 512 × 512 px (square) | PNG / ICO |
| Email logo | Header of transactional emails | ~300 × 80 px | PNG |
| Homepage banners | Storefront & app home carousel | 1200 × 600 px | PNG / JPG |
Web — Content & Pages (No Code)
All customer-facing content is managed from the Admin Panel and served to the storefront and both apps:
| Content | Where to edit | Shows up in |
|---|---|---|
| Homepage banners & featured sections | Admin Panel → Website Setup | Storefront home + Customer App home carousel |
| About Us, Privacy Policy, Terms & Conditions, Refund / Cancellation Policy | Admin Panel → Website Setup → Pages (rich-text page builder) | Storefront footer pages + app content screens |
| FAQs | Admin Panel → FAQ management | Storefront + app Help screens |
| Blog posts | Admin Panel → Blog | Storefront blog |
| Social media links | Admin Panel → Website Setup → Social Links | Storefront footer |
| Contact & support info | Admin Panel → Business Setup (email, phone, address) | Storefront contact page + app Support screens |
| Cookie consent banner | Admin Panel → Settings → Cookies Setup | Storefront |
Editing a Policy Page
- Open the page builder — Admin Panel → Website Setup → select the page (e.g. Privacy Policy).
- Write your content — the rich-text editor supports headings, lists, links, and images.
- Save and verify — open the page on the storefront footer, then check the same content appears in the app under Account → Privacy Policy (it is fetched from
/api/v1/customer/app-screen/privacy).
Email Templates
- Logo, business name, and colors used in emails come from Business Setup — set them once as described above.
- Template text is managed in Admin Panel → Settings → email template configuration.
- Developers can restyle the HTML directly: Mailable classes live in
app/Mail/, Blade views inresources/views/emails/.
php artisan queue:work) or set QUEUE_CONNECTION=sync on hosts
without a persistent worker, otherwise template changes will appear to "not work" simply
because no mail is being sent.
Mobile Apps — Rename the App & Change the Bundle ID
Do this once per app (Customer and Deliveryman), before registering the apps with Firebase — the bundle ID you choose here must match the one you register there.
Step 1 — Android: display name
Edit android/app/src/main/AndroidManifest.xml and change the label:
<application
    android:label="YourStore"
    ... >
Step 2 — Android: application ID (package name)
Edit android/app/build.gradle.kts and set your reverse-domain ID:
defaultConfig {
    applicationId = "com.yourcompany.yourstore"
    ...
}
applicationId permanently identifies your app on Google Play — it cannot be
changed after the first release. Pick your final ID now, and use a different ID for
the Customer and Deliveryman apps (e.g. …yourstore and
…yourstore.delivery).
Step 3 — iOS: display name and bundle identifier
-
Open the workspace —
open ios/Runner.xcworkspacein Xcode. -
Set the Bundle Identifier — select the Runner target → Signing & Capabilities → set Bundle Identifier to
com.yourcompany.yourstore. -
Set the Display Name — in the General tab set Display Name (or edit
CFBundleDisplayName/CFBundleNameinios/Runner/Info.plist).
Step 4 — Re-register with Firebase
Firebase config files are tied to the bundle ID. After renaming, register the new IDs in your
Firebase project and replace android/app/google-services.json and
ios/Runner/GoogleService-Info.plist, or re-run flutterfire configure.
Then rebuild:
flutter clean
flutter pub get
flutter run
Mobile Apps — App Icon
The fastest way is the flutter_launcher_icons package, which generates every required size from one image:
-
Prepare your icon A 1024 × 1024 px PNG, no transparency for iOS (Apple requires an opaque icon). Save it as
assets/images/app_icon.pngin the app project. -
Add the dev dependency and config to
pubspec.yaml:dev_dependencies: flutter_launcher_icons: ^0.14.0 flutter_launcher_icons: android: true ios: true image_path: "assets/images/app_icon.png"
-
Generate the icons:
flutter pub get
dart run flutter_launcher_icons
This overwritesandroid/app/src/main/res/mipmap-*/ic_launcher.pngandios/Runner/Assets.xcassets/AppIcon.appiconset/automatically. -
Verify Run
flutter runand check the icon on the device's home screen / app drawer.
Prefer manual control? Replace the images directly in the two folders above using your own generated sizes.
Mobile Apps — Splash Screen
- Android: edit
android/app/src/main/res/drawable/launch_background.xmland replace the referenced drawable with your logo image. - iOS: replace the images in
ios/Runner/Assets.xcassets/LaunchImage.imageset/(1x / 2x / 3x sizes). - Automated alternative: the
flutter_native_splashpackage generates both platforms from one config — add it topubspec.yaml, setcolorandimage, and rundart run flutter_native_splash:create. - The in-app animated splash (after the native splash) lives in
lib/features/splash/— swap the Lottie/logo asset there if you want to change it.
Mobile Apps — Theme Colors
-
Open the theme folder Both apps define their theme in
lib/config/theme/— colors, typography, and component themes for light and dark mode. -
Replace the seed / primary colors Set the same hex values you entered in the web installer (Theme Setup) or in Business Setup, so web and mobile branding match. Every widget reads colors via
Theme.of(context), so the change propagates app-wide. -
Hot-reload to preview Run
flutter runand pressrafter each tweak. Check both light and dark modes (the Deliveryman App has a theme toggle in Settings).
Mobile Apps — Text, Images & Animations
UI Text (Translations)
Every user-visible string lives in the ARB localization files — edit the English source and any other languages you support, then regenerate:
# 1. Edit the strings
lib/l10n/arb/app_en.arb     (plus app_es / app_ar / app_hi / app_bn)

# 2. Regenerate the localization classes
flutter gen-l10n
Images & Illustrations
- Static images / logos:
assets/images/(SVGs underassets/images/svg/) - Lottie animations (splash, empty states, success screens):
assets/json/— replace the.jsonfiles with your own from lottiefiles.com - Asset references are code-generated — after adding or renaming files run
dart run build_runner build --delete-conflicting-outputsto refreshassets.gen.dart
Onboarding Screens
The first-run onboarding flow lives in lib/features/onboarding/. Swap the
illustration assets and edit the title/subtitle strings in the ARB files to tell your own story.
Currency Symbol (Deliveryman App)
The Customer App takes currency from the backend config; the Deliveryman App also allows a local override — see Deliveryman App → Configuration → Currency Symbol.
Advanced Web Theming (Developers)
For visual changes beyond the admin settings, the web UI is styled with Tailwind CSS 4 driven by CSS variables:
- Color tokens and design variables:
resources/css/app.css(Tailwind v4@themeconfiguration) - Admin panel pages:
resources/js/AdminPanel/Pages/; storefront pages:resources/js/StoreFront/Pages/ - Shared UI components:
resources/js/components/(add Shadcn components withnpm run shadcn:admin/npm run shadcn:storefront) - After any code-level change, rebuild assets:
npm run build
app.css only for typography, spacing, or component-level styling
changes.
White-Label Checklist
Work through this list top to bottom for a complete rebrand:
- Business name set in Admin Panel → Business Setup
- Logo uploaded (transparent PNG) and visible on the storefront header
- Favicon uploaded and visible in the browser tab
- Primary + secondary brand colors set (web) and matched in both apps'
lib/config/theme/ - Homepage banners replaced with your own campaigns
- About / Privacy / Terms / Refund / Cancellation pages written
- FAQ entries and support contact details updated
- Email templates reviewed with your name and logo
- Both apps renamed (Android label + iOS display name)
- Both apps' bundle IDs changed and re-registered with Firebase
- App icons generated for both apps (Android + iOS)
- Splash screens replaced (native + in-app)
- Onboarding screens and Lottie animations customized
- ARB translation strings reviewed for your store's tone
Need help? Reach us via the item’s Support tab on CodeCanyon or dayonesoft.com or visit our website for support.