Introduction
The DayOneMart Customer App is a cross-platform mobile application built with Flutter for Android and iOS. It provides customers with an end-to-end shopping experience — browsing products, placing orders, real-time tracking, live chat, wallet management, loyalty points, and more.
The app connects exclusively to the OneMart Admin & Web backend via the
REST API at /api/v1/customer/*. Real-time features (chat, notifications) are
powered by Firebase Cloud Messaging.
Technology Stack
| Layer | Package / Technology | Version |
|---|---|---|
| Framework | Flutter | SDK (stable) |
| Language | Dart | ^3.10.0 |
| State Management | flutter_bloc + BLoC | ^9.1 / ^9.2 |
| Persisted State | hydrated_bloc | ^11.0 |
| Navigation | go_router | ^17.2 |
| Dependency Injection | get_it + injectable | ^9.2 / ^2.7 |
| Code Generation | freezed + json_serializable | ^3.2 / ^6.13 |
| Networking | http | ^1.6 |
| Firebase | Core, Messaging, Crashlytics, Analytics | ^4.7 / ^16.2 |
| Maps & Location | google_maps_flutter + geolocator + geocoding | ^2.17 / ^14.0 / ^4.0 |
| Social Auth | google_sign_in, flutter_facebook_auth, sign_in_with_apple | ^7.2 / ^7.1 / ^7.0 |
| Images | cached_network_image + flutter_image_compress | ^3.4 / ^2.4 |
| Animations | lottie | ^3.3 |
| Localization | flutter_localizations + intl | SDK / ^0.20 |
| Notifications | flutter_local_notifications + timezone | ^21.0 / ^0.11 |
| Secure Storage | flutter_secure_storage | ^10.0 |
| PDF / Files | flutter_html_to_pdf_plus + open_filex | Latest |
| Crash Reporting | firebase_crashlytics | ^5.2 |
Architecture Overview
The app follows a feature-first clean architecture pattern:
- Feature modules — each feature is self-contained under
lib/features/<feature>/ - BLoC pattern — UI is decoupled from business logic via Blocs and Cubits
- GetIt / Injectable — dependency injection with code-generated service locator
- Freezed — immutable data classes and sealed union states
- GoRouter — declarative navigation with deep-link support
- Repository pattern — data sources are abstracted behind repository interfaces
App Features
Key Screens (Annotated)
Capture these core screens on a device or emulator and annotate the numbered areas below with arrows or callouts before resubmission. Save each image with the exact file name shown.
 1
2
3
4
1
2
3
4
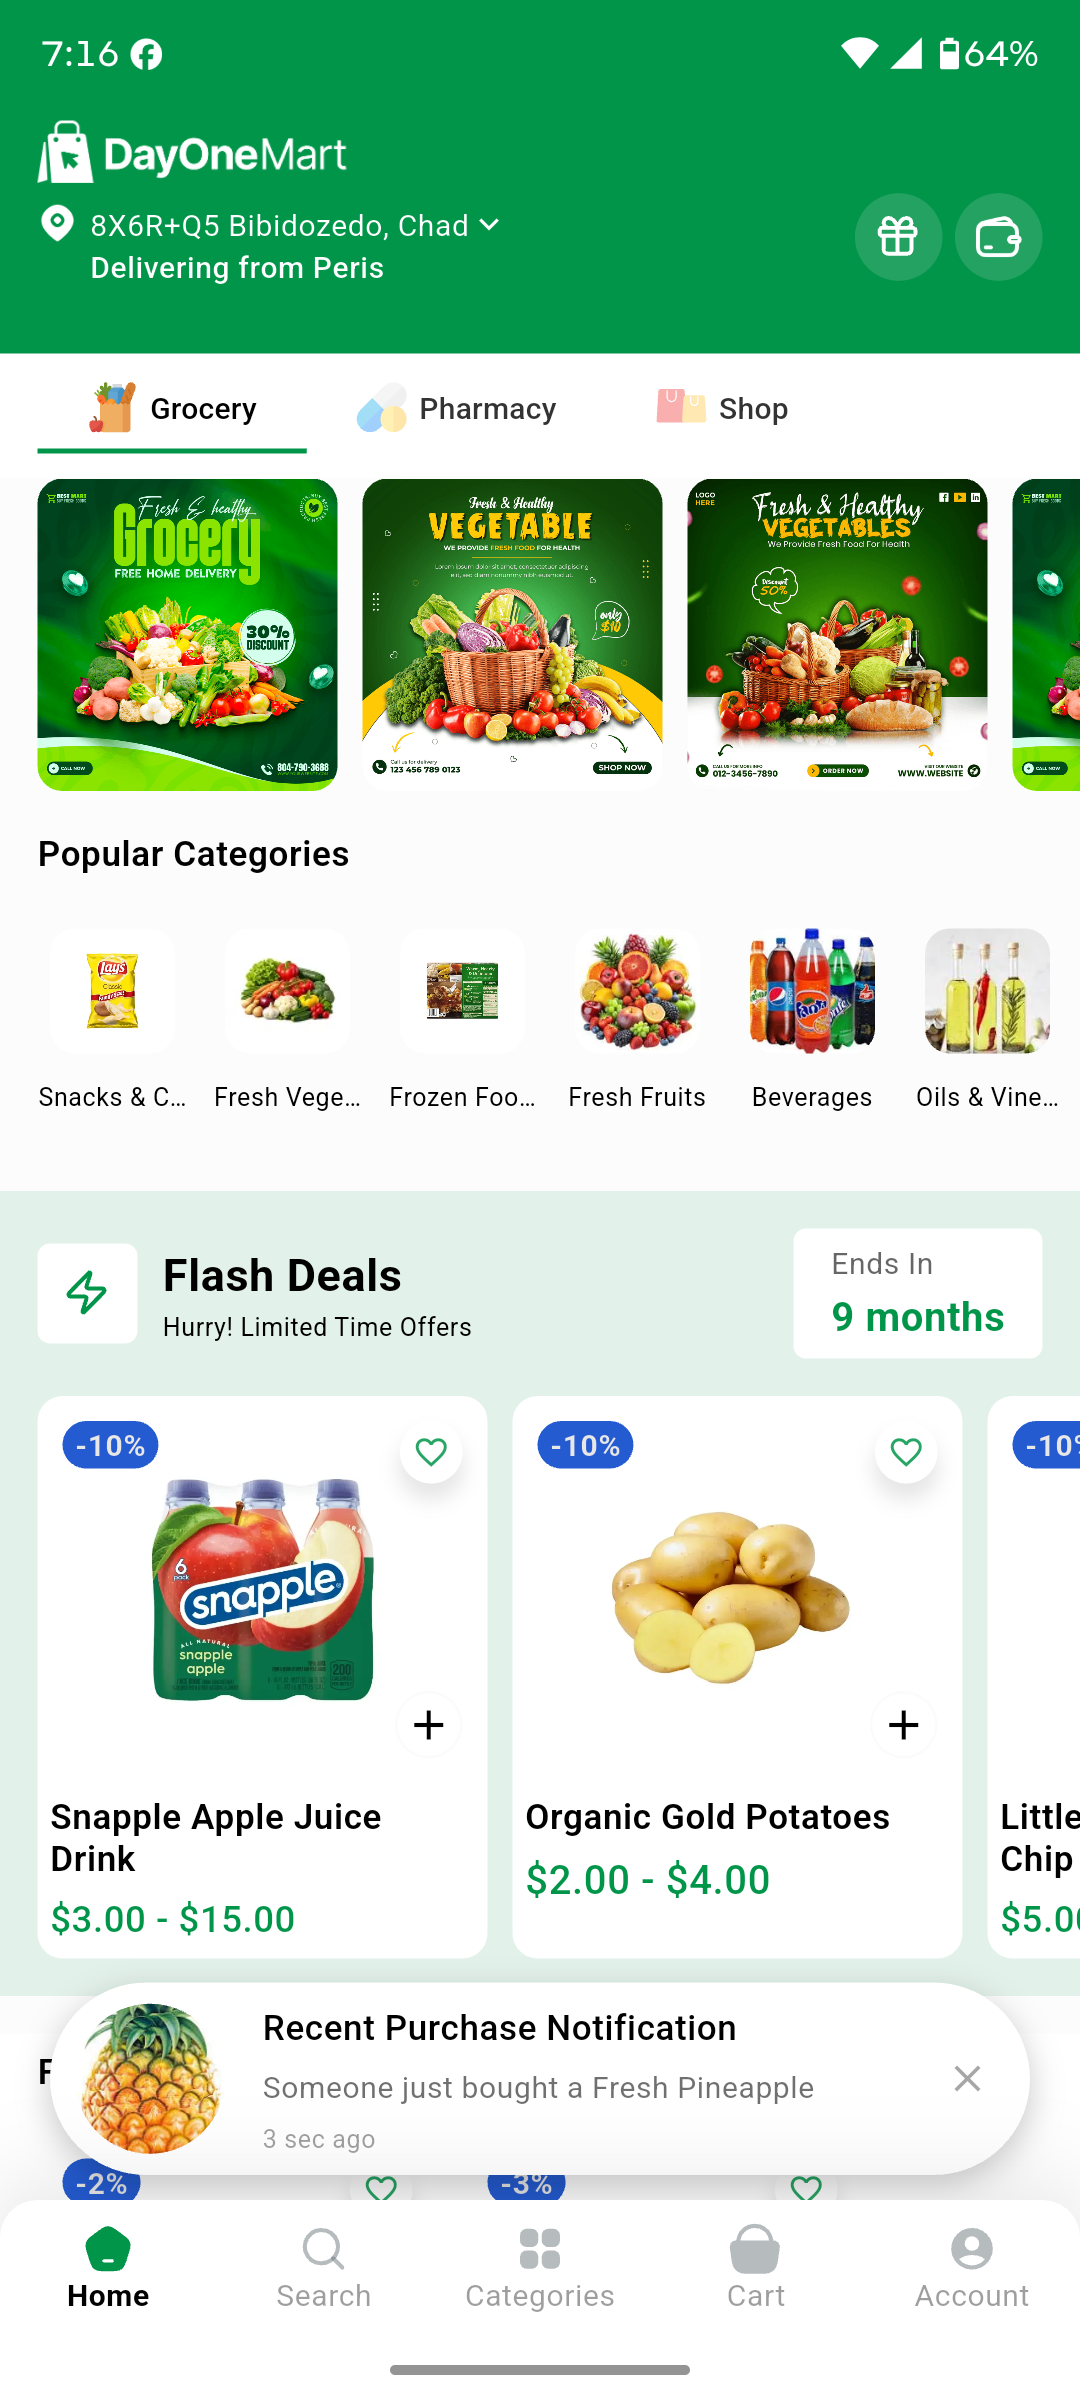
Key areas of this screen
- Delivery location — the customer's address selector, plus the gift and wallet shortcuts.
- Module tabs — switch between Grocery, Pharmacy, and Shop.
- Promotional banners — the swipeable carousel managed from the admin panel.
- Popular Categories & Flash Deals — quick category access and time-limited offers; the bottom bar navigates Home, Search, Categories, Cart, and Account.
 1
2
3
4
1
2
3
4
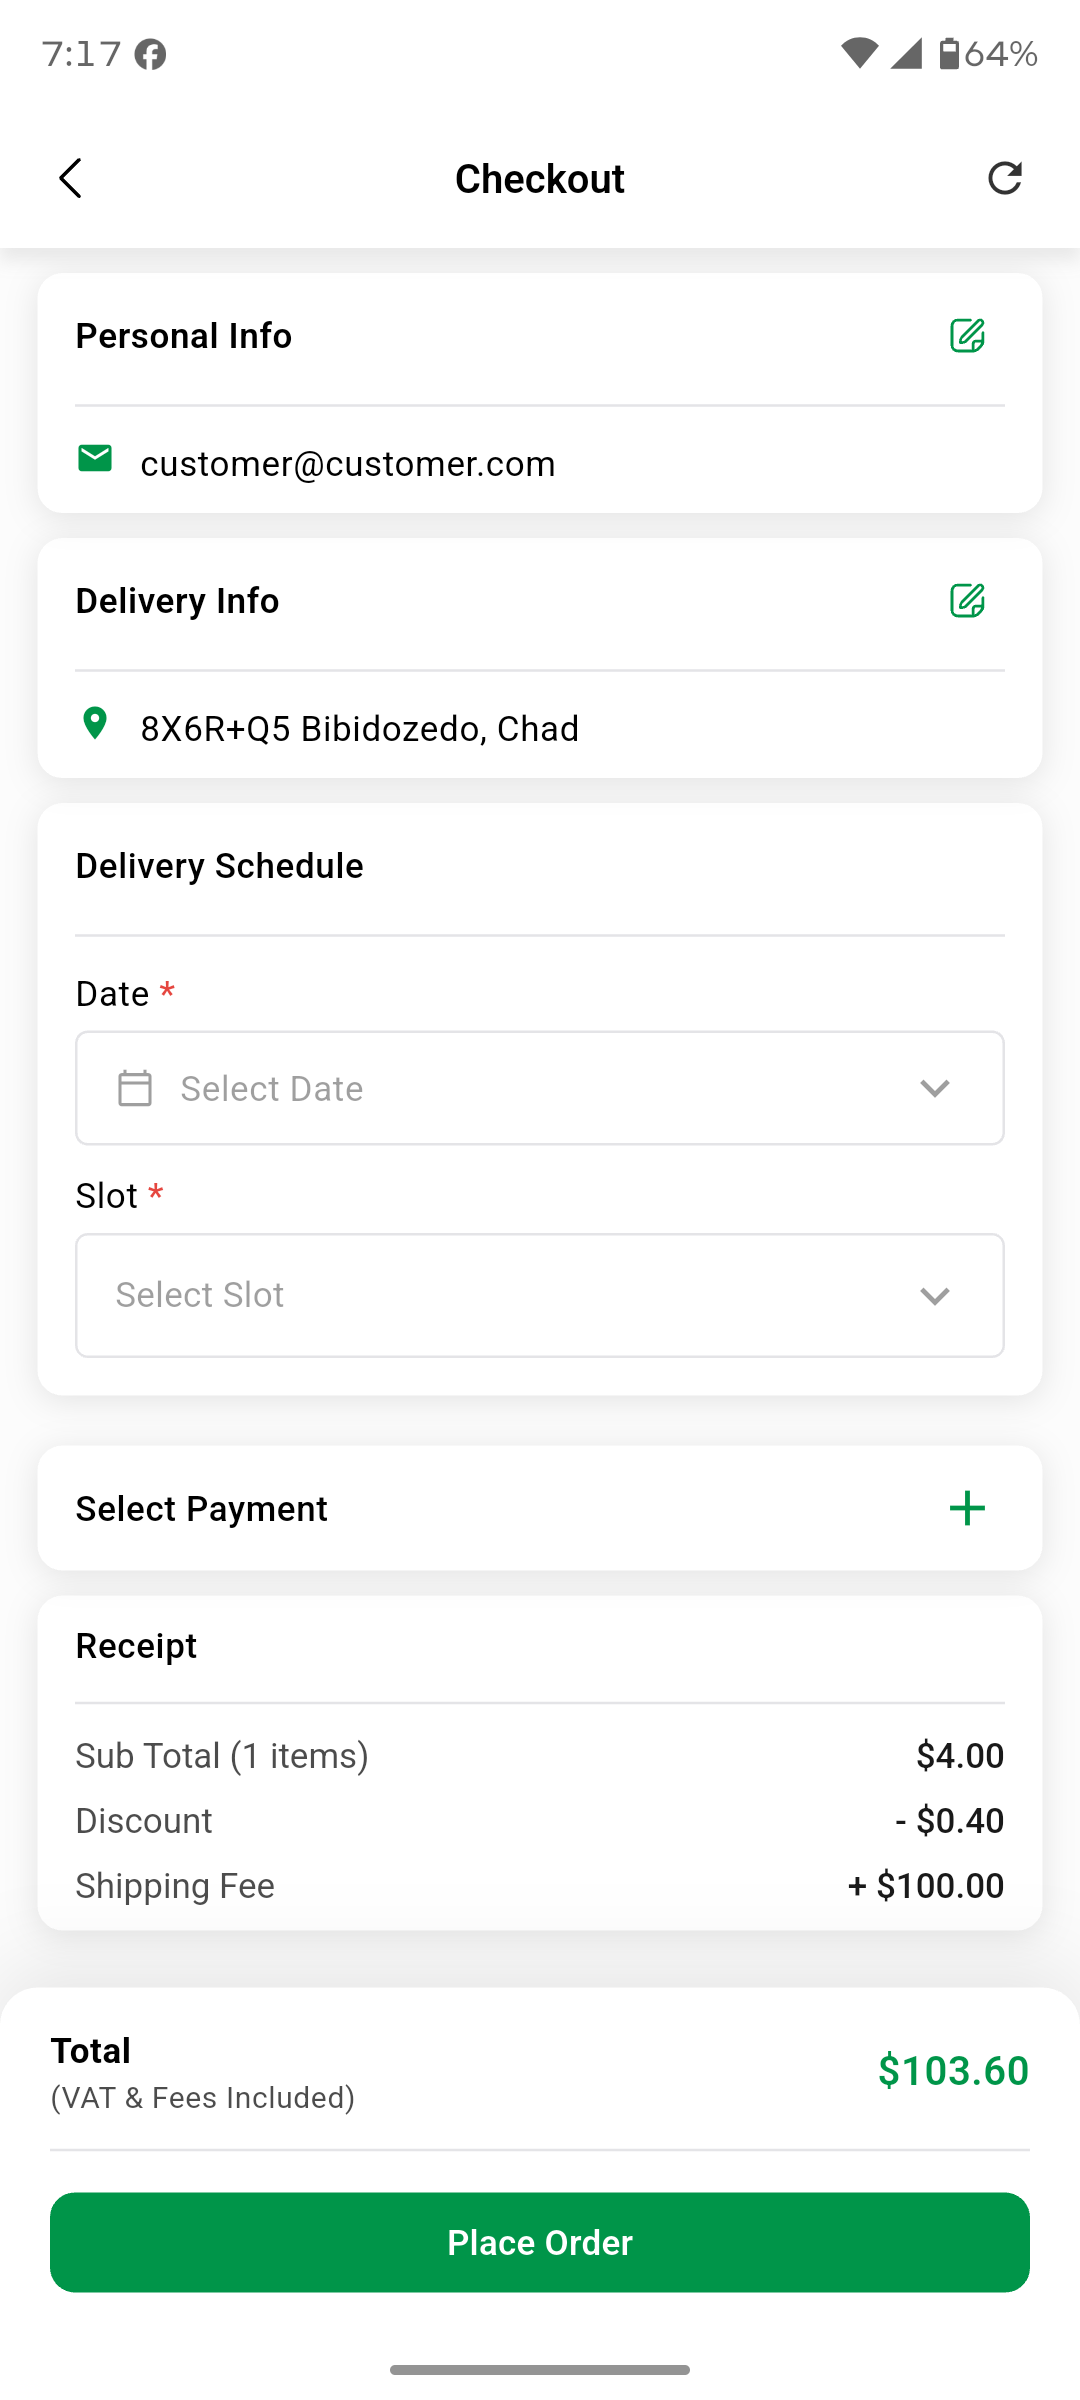
Key areas of this screen
- Personal & Delivery Info — the customer's email and the selected drop-off address (editable).
- Delivery Schedule — pick a delivery date and time slot.
- Select Payment — choose a payment method / gateway.
- Receipt & Place Order — subtotal, discount, shipping fee, VAT-inclusive total, and the Place Order button.
 1
2
3
4
1
2
3
4
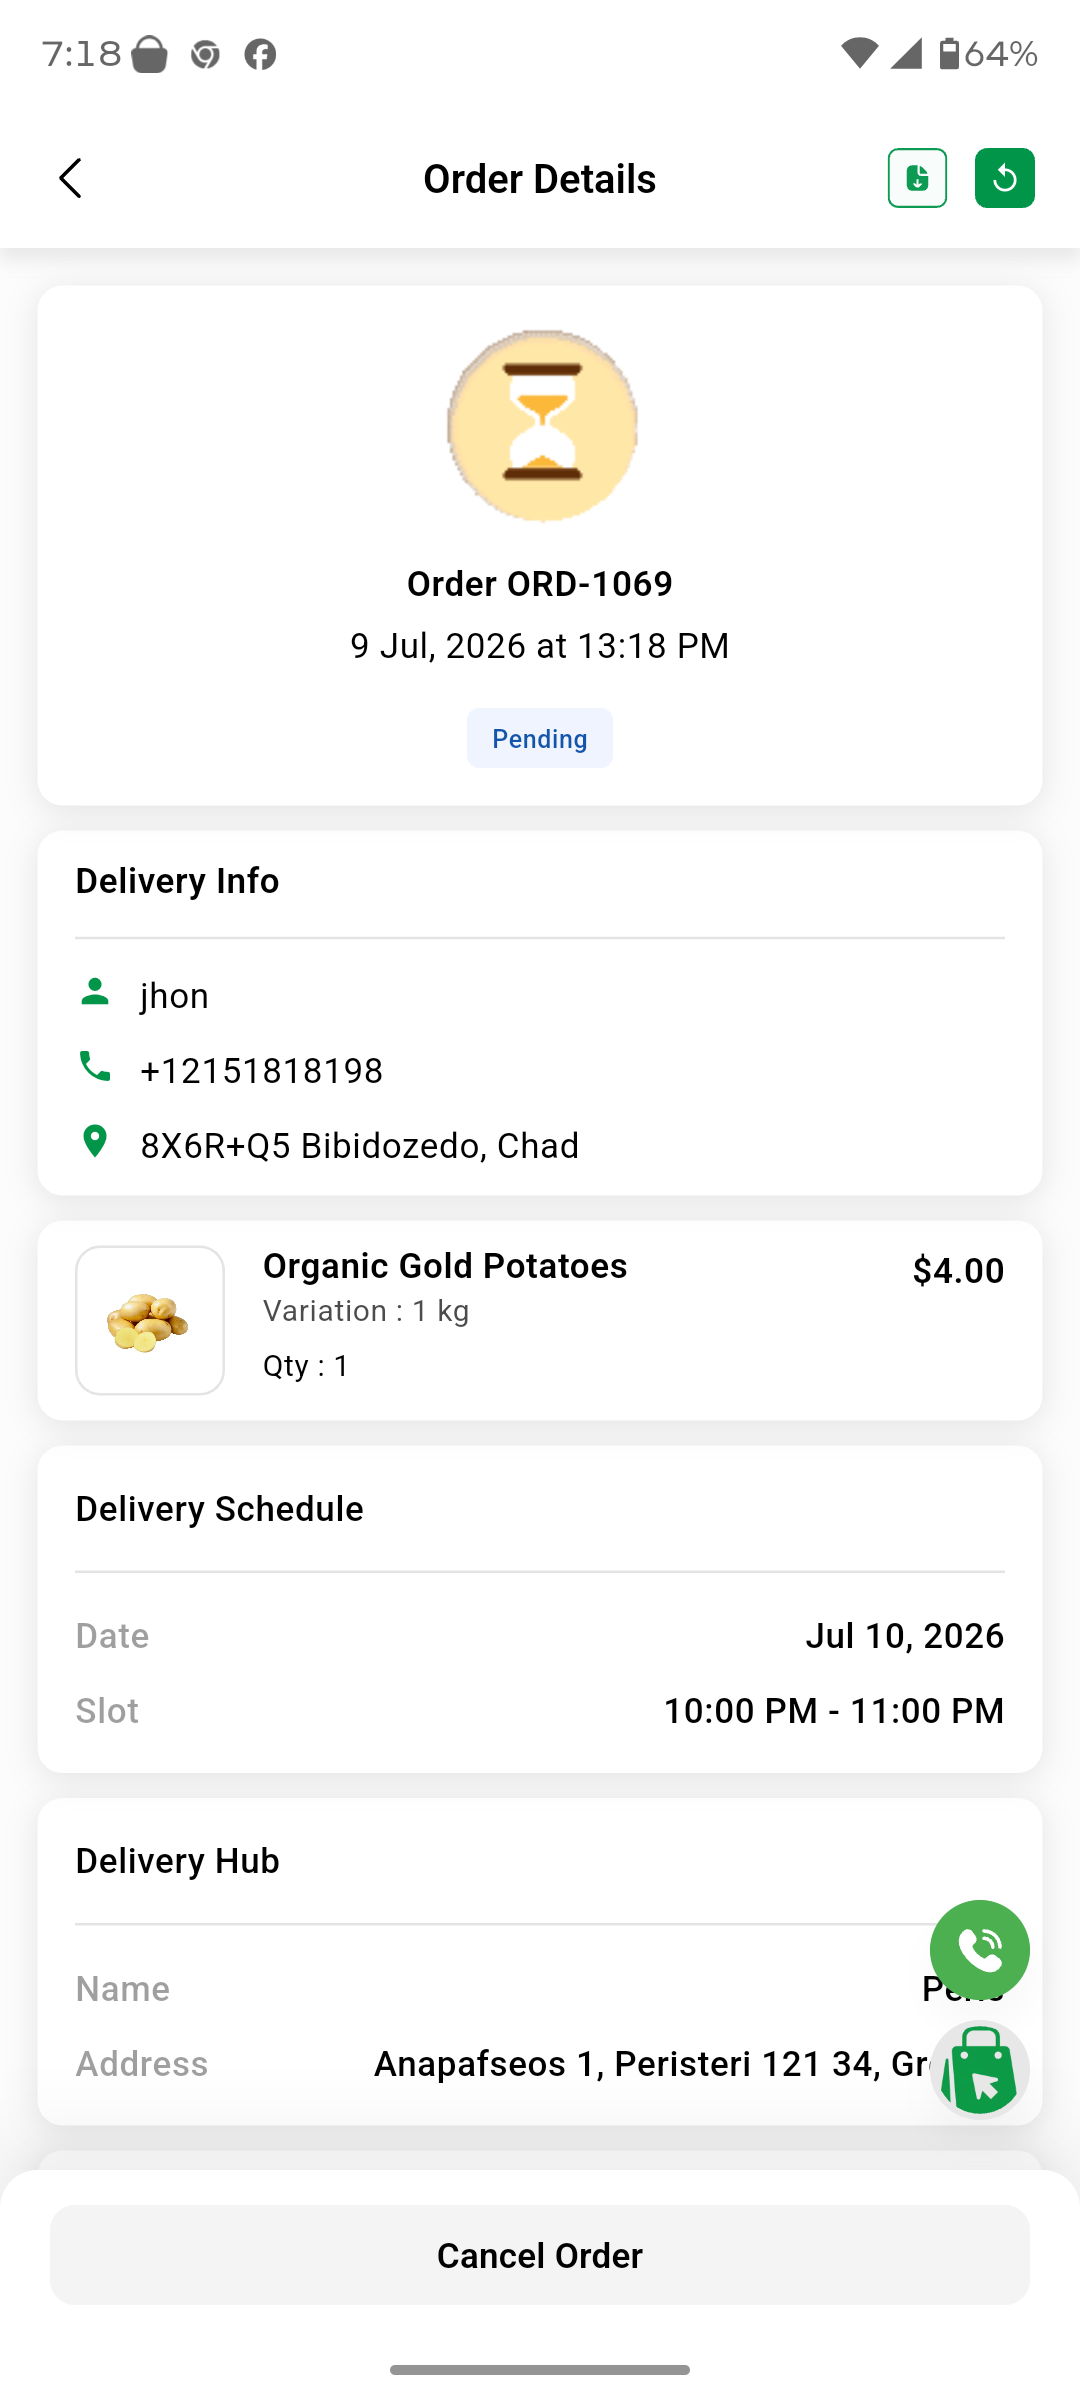
Key areas of this screen
- Order status — the order number and current stage (e.g. Pending → Confirmed → On the Way → Delivered).
- Delivery Info — recipient name, phone, and delivery address.
- Ordered items & schedule — the products with variation/quantity/price and the chosen delivery date and slot.
- Delivery Hub & actions — the fulfilling hub, the floating call/support buttons, and Cancel Order.
Prerequisites
Development Machine Requirements
| Tool | Minimum Version | Notes |
|---|---|---|
| Flutter SDK | 3.x (stable channel) | Run flutter --version to check |
| Dart SDK | ^3.10.0 | Bundled with Flutter |
| Android Studio | Hedgehog (2023.1+) | Required for Android builds |
| Xcode | 15+ | macOS only — required for iOS builds |
| CocoaPods | Latest | macOS only — sudo gem install cocoapods |
| Java JDK | 17 | For Android Gradle builds |
| Node.js | 18+ (optional) | Needed for Firebase CLI (flutterfire) |
External Services Required
- Firebase Project — push notifications, analytics, crashlytics
- Google Maps API Key — maps, geocoding, place autocomplete
- Facebook App — Facebook social login (optional)
- Apple Developer Account — Sign in with Apple and iOS distribution
- Backend URL — a running OneMart Admin & Web instance
Flutter Environment Check
flutter doctor -v
Resolve all errors before proceeding. Warnings for unneeded platforms (e.g. Linux, Windows) can be ignored if you only target Android/iOS.
Project Structure
lib/
├── main.dart                       ← App entry point
├── firebase_options.dart           ← Generated by FlutterFire CLI
│
├── config/
│   ├── route/
│   │   └── route_config.dart       ← GoRouter route definitions
│   ├── theme/                      ← App theme (colors, typography)
│   └── util/
│       ├── app_constants.dart      ← API base URL + all endpoints
│       ├── assets.gen.dart         ← Generated asset references
│       ├── dimensions.dart         ← Spacing / size constants
│       ├── instance_names.dart     ← GetIt named instance keys
│       └── styles.dart             ← Reusable TextStyles
│
├── core/
│   ├── data/                       ← Base network client, interceptors, enums
│   ├── dependency_injection/       ← GetIt setup + injectable module
│   └── helper/                     ← Utility helpers (notifications, extensions)
│
├── features/                       ← Feature-first modules
│   ├── splash/
│   ├── onboarding/
│   ├── login/                      ← Auth BLoC, repo, screens
│   ├── home/
│   ├── dashboard/
│   ├── category/
│   ├── menu/
│   ├── search/
│   ├── cart/
│   ├── checkout/
│   ├── offers/
│   ├── order/
│   ├── payment/
│   ├── wallet/
│   ├── loyalty_point/
│   ├── referral/
│   ├── wishlist/
│   ├── review/
│   ├── notification/
│   ├── chat/
│   ├── account/
│   ├── address/
│   ├── settings/
│   ├── about_us/
│   ├── contact_us/
│   ├── faq/
│   ├── privacy_policy/
│   ├── terms_and_condition/
│   ├── refund_policy/
│   ├── common_condition/
│   ├── html/
│   ├── webview/
│   └── file_viewer/
│
└── l10n/
    ├── arb/                        ← ARB localization source files
    │   ├── app_en.arb
    │   ├── app_es.arb
    │   ├── app_ar.arb
    │   ├── app_hi.arb
    │   └── app_bn.arb
    └── gen/                        ← Generated localization classes
        └── app_localizations.dart

assets/
├── images/                         ← PNG / JPG images
│   ├── svg/                        ← SVG icons
│   │   └── flags/                  ← Country flag SVGs
│   └── gif/                        ← Animated GIFs
└── json/                           ← Lottie animation JSON files
Feature Module Structure
Each feature follows the same internal layout:
features/order/
├── data/
│   ├── datasource/         ← Remote data source (API calls)
│   ├── model/              ← Freezed + JSON serializable DTOs
│   └── repository/         ← Repository implementation
├── domain/
│   ├── entity/             ← Clean domain entities
│   └── repository/         ← Repository abstract interface
└── presentation/
    ├── bloc/               ← BLoC / Cubit + States + Events
    ├── screen/             ← Full-screen widgets
    └── widget/             ← Reusable widgets for this feature
Installation Guide (Step-by-Step)
Follow these steps in order to go from the downloaded ZIP to the app running on a device. Steps 6–8 point to their own detailed sections further down this page.
Before You Start — Checklist
- Flutter SDK installed and
flutter doctorpasses - Android Studio / Xcode configured with emulator/simulator
- Firebase project created (you will register the apps in Step 6)
- Google Maps API key obtained and enabled for Maps SDK, Geocoding, Places APIs
- Backend (Admin & Web) is deployed and accessible — install it first
- Facebook App ID and client token ready (if enabling Facebook login)
-
Extract the project Unzip the package and open the
Customer Appfolder in your editor (VS Code / Android Studio). All commands below are run from this folder. -
Verify your Flutter environment
flutter doctor -v
Fix any reported errors before continuing (missing Android SDK, unaccepted licenses, no Xcode). Warnings about platforms you don't target can be ignored. -
Install dependencies
flutter pub get
-
Generate code The project uses code generation for models, dependency injection, assets, and translations — the app will not compile without this step:
dart run build_runner build --delete-conflicting-outputs
flutter gen-l10n
-
Point the app at your backend Open
lib/config/util/app_constants.dartand setbaseUrlto your deployed Admin & Web instance (alwayshttps://in production):static const String baseUrl = 'https://yourdomain.com';
Details in Configuration. -
Connect Firebase Register the Android and iOS apps in your Firebase project, then place
google-services.jsoninandroid/app/andGoogleService-Info.plistinios/Runner/(or runflutterfire configure). Full walkthrough: Firebase Setup. -
Add your Google Maps API key Copy
secrets.xml.exampletoandroid/app/src/main/res/values/secrets.xmland fill in the key; add the iOS key toInfo.plist. Full walkthrough: Google Maps Setup. -
(Optional) Configure social login Google works out of the box once Firebase is connected; Facebook and Apple need provider setup — see Social Auth Setup.
-
Run the app
flutter devices                  # list connected devices
flutter run -d <device-id>      # debug build on a device
flutter run --release            # production-like build
Log in with a customer account created on your storefront, browse products, and place a test order to confirm the backend connection. -
Rebrand and release Rename the app, set your bundle ID, icon, splash, and colors using the Branding & Customization Guide, then produce store builds following Build & Release.
Configuration
API Base URL
Open lib/config/util/app_constants.dart and update the baseUrl
to point to your deployed OneMart Admin & Web instance:
// lib/config/util/app_constants.dart

class AppConstants {
  static const String baseUrl = 'https://yourdomain.com';
  // All endpoint paths are defined as constants below...
}
App Module
The app supports multiple business modules. The default is set in lib/config/util/app_constants.dart:
// lib/config/util/app_constants.dart
static const AppModule defaultModule = AppModule.grocery;
Change this enum value to match your business type if needed.
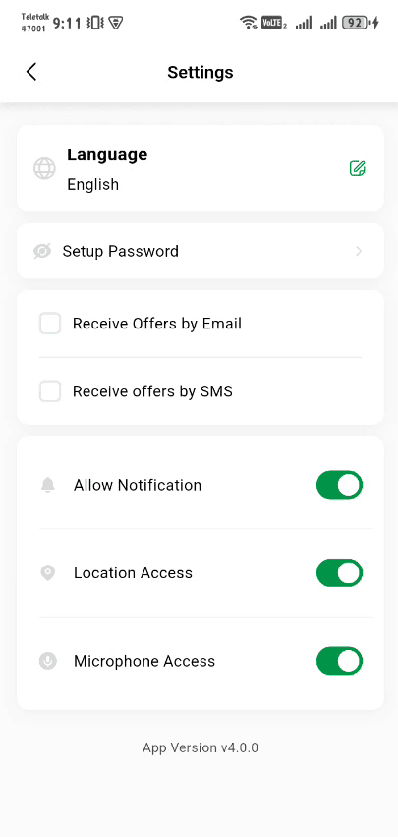
Annotate on the Settings screen
- Language selector — switch the app's display language.
- Set up password — for accounts created via OTP/social login.
- Offer preferences — email/SMS marketing opt-in toggles.
- Permission toggles — notification, location, and microphone access.
lib/config/util/app_constants.dart (see above).
App Name & Bundle ID
| Platform | File | Key |
|---|---|---|
| Android | android/app/build.gradle |
applicationId |
| Android | android/app/src/main/AndroidManifest.xml |
android:label |
| iOS | ios/Runner/Info.plist |
CFBundleName, CFBundleIdentifier |
Firebase Setup
Step 1 — Create a Firebase Project
-
Go to the Firebase Console and create a new project (or use an existing one shared with the backend).
-
Register Android app — use the package name from
android/app/build.gradle(default:com.dayonesoft.onemartcustomer). Downloadgoogle-services.jsonand place it atandroid/app/google-services.json. -
Register iOS app — use the bundle ID from Xcode. Download
GoogleService-Info.plistand add it to Xcode atios/Runner/GoogleService-Info.plist.
Step 2 — Generate firebase_options.dart (Recommended)
Use the FlutterFire CLI for a clean, automated setup:
# Install FlutterFire CLI
dart pub global activate flutterfire_cli

# Configure — follow the interactive prompts
flutterfire configure
This generates/updates lib/firebase_options.dart automatically.
firebase_options.dart file already exists in the project with sample
values. Replace its contents with the output from flutterfire configure.
Step 3 — Enable Firebase Services
In the Firebase Console, enable the following services:
- Cloud Messaging (FCM) — required for push notifications
- Crashlytics — automatic crash reporting
- Analytics — usage analytics
- Authentication — enable Google, Facebook, and Apple sign-in providers
FCM Topics
The app subscribes to the following FCM topics on launch:
customer-group    // All customer-specific broadcast messages
all-general       // Platform-wide announcements
Google Maps Setup
Step 1 — Enable APIs in Google Cloud Console
- Maps SDK for Android
- Maps SDK for iOS
- Places API
- Geocoding API
- Directions API
Step 2 — Add API Key to secrets.xml (Android)
Copy the template and fill in your key:
cp secrets.xml.example android/app/src/main/res/values/secrets.xml
<!-- android/app/src/main/res/values/secrets.xml -->
<resources>
  <string name="google_maps_api_key">YOUR_GOOGLE_MAPS_API_KEY</string>
  <string name="facebook_app_id">YOUR_FACEBOOK_APP_ID</string>
  <string name="fb_login_protocol_scheme">fbYOUR_FACEBOOK_APP_ID</string>
  <string name="facebook_client_token">YOUR_FACEBOOK_CLIENT_TOKEN</string>
</resources>
Step 3 — Add API Key for iOS
In ios/Runner/AppDelegate.swift, the Maps key is read from the Info.plist.
Add it to ios/Runner/Info.plist:
<key>GoogleMapsApiKey</key>
<string>YOUR_GOOGLE_MAPS_API_KEY</string>
Social Auth Setup
Google Sign-In
- Enable Google as a sign-in provider in your Firebase project
- The
google-services.json/GoogleService-Info.plistfiles include the required OAuth client IDs automatically - No additional native code changes required
Facebook Login
-
Create a Facebook App at developers.facebook.com. Add "Facebook Login" as a product. Note the App ID and client token.
-
Add credentials to secrets.xml (Android) as shown in the Google Maps section above.
-
iOS: Add
FacebookAppID,FacebookClientToken, andFacebookDisplayNamekeys toios/Runner/Info.plist. Also add the URL schemefb{YOUR_APP_ID}to theCFBundleURLSchemesarray.
Sign in with Apple
- Requires an Apple Developer Account
- Enable "Sign in with Apple" capability in your App ID on developer.apple.com
- Enable the Apple sign-in provider in Firebase Authentication
- In Xcode: open
ios/Runner.xcworkspace→ Signing & Capabilities → add "Sign in with Apple" - Sign in with Apple is iOS-only; it is conditionally hidden on Android
Localization
The app supports 5 languages out of the box:
| Language | Code | ARB File |
|---|---|---|
| English | en | lib/l10n/arb/app_en.arb |
| Spanish | es | lib/l10n/arb/app_es.arb |
| Arabic | ar | lib/l10n/arb/app_ar.arb |
| Hindi | hi | lib/l10n/arb/app_hi.arb |
| Bangla | bn | lib/l10n/arb/app_bn.arb |
Localization Config
The localization configuration is defined in l10n.yaml:
arb-dir: lib/l10n/arb
template-arb-file: app_en.arb
output-localization-file: app_localizations.dart
output-dir: lib/l10n/gen
nullable-getter: false
Adding a New Language
-
Create a new ARB file, e.g.
lib/l10n/arb/app_fr.arb. Copy the structure fromapp_en.arband translate all strings. -
Add the language to the
languageslist inapp_constants.dart:LanguageModel(code: 'fr', name: 'French', nativeName: 'Français'),
-
Regenerate localization files:
flutter gen-l10n
ar) is an RTL language. Flutter handles layout mirroring automatically
when the ar locale is active. Untranslated strings are tracked in
untranslated.txt at the project root.
Mobile App Build Requirements
Before you can produce a store-ready build of the app, both platforms require their own code-signing setup. This section walks through Android keystore generation and iOS code signing end to end. Complete these once per app; the signing material is then reused for every future release and update.
| Platform | You need | Where it is used |
|---|---|---|
| Android | An upload/release keystore (.jks) + key.properties | Signs the .aab / .apk for Google Play |
| iOS | Apple Developer Program membership, a Distribution certificate, an App ID, and a provisioning profile | Signs the .ipa for the App Store / TestFlight |
Android — Keystore Generation
Google Play requires every release build to be digitally signed with a keystore you own.
Generate one with the JDK's keytool utility:
keytool -genkey -v \
  -keystore upload-keystore.jks \
  -keyalg RSA -keysize 2048 -validity 10000 \
  -alias upload
You will be prompted for a keystore password, a key password, and your organisation details.
This produces an upload-keystore.jks file. Move it into the Android app module
(for example android/app/upload-keystore.jks), then create
android/key.properties so Gradle can locate and use it:
# android/key.properties
storePassword=<your-store-password>
keyPassword=<your-key-password>
keyAlias=upload
storeFile=upload-keystore.jks
The app's android/app/build.gradle.kts is already wired to read
key.properties and apply the release signing config automatically — no further
Gradle edits are needed. Once the file is in place, flutter build appbundle --release
produces a signed, upload-ready bundle.
.jks keystore and its passwords somewhere safe and backed up, and
keep key.properties out of version control. If you lose the keystore you can
never publish an update to the same Google Play listing again.
iOS — Code Signing
iOS builds must be signed with credentials issued by Apple. You need a paid Apple Developer Program membership before you can create a distributable build.
-
Register an App ID (Bundle Identifier) In the Apple Developer portal → Certificates, Identifiers & Profiles → Identifiers, register a unique bundle ID (e.g.
com.yourcompany.onemartcustomer). Enable the capabilities the app uses (Push Notifications, Sign in with Apple). -
Create a Distribution certificate Under Certificates, create an Apple Distribution certificate and install it into your Mac's login Keychain. This is the identity that signs release builds.
-
Create a provisioning profile Create an App Store distribution provisioning profile that links your App ID to your distribution certificate, then download and double-click it to install.
-
Configure signing in Xcode Open
ios/Runner.xcworkspace→ select the Runner target → Signing & Capabilities. Set your Team and the Bundle Identifier to match the App ID above. For most users, Automatically manage signing is the simplest option; choose manual signing only if you manage profiles yourself. -
Create the app record in App Store Connect In App Store Connect, create a new app using the same bundle ID so you can upload builds to TestFlight and the App Store.
Build & Release
Android — Debug Build
flutter build apk --debug
# Output: build/app/outputs/flutter-apk/app-debug.apk
Android — Release APK
flutter build apk --release
# Output: build/app/outputs/flutter-apk/app-release.apk
Android — App Bundle (Google Play)
flutter build appbundle --release \
  --obfuscate \
  --split-debug-info=build/app/outputs/symbols
# Output: build/app/outputs/bundle/release/app-release.aab
--obfuscate shrinks and obfuscates Dart code.
--split-debug-info separates debug symbols needed for
deobfuscating stack traces in Crashlytics. Save the symbols directory alongside your release.
Android — Signing
The app is already configured to automatically sign release builds when you provide a key.properties file.
-
Create a release keystore:
keytool -genkey -v -keystore android/app/upload-keystore.jks \
  -keyalg RSA -keysize 2048 -validity 10000 -alias upload
-
Create
android/key.properties:storePassword=<your-store-password> keyPassword=<your-key-password> keyAlias=upload storeFile=upload-keystore.jks
.jks) and key.properties file safe.
You need them for every future app update on Google Play. Losing the keystore means
you cannot publish updates to the same listing.
iOS — Debug
flutter build ios --debug --simulator
iOS — Release (App Store)
flutter build ipa --release \
  --obfuscate \
  --split-debug-info=build/ios/symbols
Then open build/ios/ipa in Xcode Organizer or use Transporter to upload to App Store Connect.
Publishing to Google Play — Step by Step
With the signed .aab from the previous section, here is the complete path from
build to a live Google Play listing:
-
Create a Google Play developer account Register at play.google.com/console (one-time $25 fee). Identity verification can take a day or two for new accounts.
-
Create the app In the Play Console: All apps → Create app. Enter your app name, default language, select App (not Game) and Free, and accept the declarations.
-
Complete the "Set up your app" checklist On the app's Dashboard, work through every task before your first release: privacy policy URL (the storefront's Privacy Policy page works), App access (provide a working demo login so Google's reviewers can sign in), Ads declaration, Content rating questionnaire, Target audience, and the Data safety form — declare that the app collects location, name, email, and phone number for order delivery.
-
Build the signed bundle Confirm
android/key.propertiesis in place, then runflutter build appbundle --release. The signed bundle is written tobuild/app/outputs/bundle/release/app-release.aab. -
Test with an Internal testing release first Go to Testing → Internal testing → Create new release, upload the
.aab, add your email as a tester, and install the app on a real device via the opt-in link. Verify login, browsing, checkout, and push notifications against your live backend before going public. -
Roll out to Production Once the internal build works, go to Production → Create new release (or promote the internal release), add release notes, review, and Start rollout.
-
Wait for review First-time reviews typically take from a few hours up to about 7 days. Subsequent updates are usually much faster.
Publishing to the App Store — Step by Step
-
Prerequisites Complete the iOS code-signing setup above: Apple Developer membership, App ID, signing configured in Xcode, and the app record created in App Store Connect.
-
Build the signed archive Run
flutter build ipa --release. The signed.ipais written tobuild/ios/ipa/. -
Upload the build Open Apple's free Transporter app (Mac App Store), sign in with your Apple ID, drag the
.ipain, and click Deliver. (Alternative: open the archive in Xcode Organizer and click Distribute App.) -
Wait for processing, then test via TestFlight In App Store Connect the build appears under TestFlight after 15–60 minutes of processing. Install it on a real device with the TestFlight app and verify login, checkout, and push notifications.
-
Complete the App Store listing In App Store Connect fill in: screenshots for the required device sizes, description, keywords, support URL, privacy policy URL, and the App Privacy questionnaire (declare location, contact info, and identifiers collected for order delivery).
-
Submit for review Select the build, add review notes with a working demo account (Apple rejects apps it cannot log in to), and submit. Reviews typically complete within 24–48 hours.
Versioning App Updates
The app version lives in pubspec.yaml:
# pubspec.yaml
version: 4.0.0+40
#        │     └─ build number → Android versionCode / iOS build number
#        └─────── display version → Android versionName / iOS version
Every upload to Google Play or App Store Connect must have a higher build number
(the part after +) than the previous upload. Bump it, rebuild, and re-upload —
e.g. 4.0.0+40 → 4.0.1+41.
Common Build & Signing Errors
| Error | Cause | Fix |
|---|---|---|
Keystore was tampered with, or password was incorrect |
Wrong storePassword / keyPassword in key.properties |
Re-check both passwords; they must match what you entered in keytool. |
| Release build is signed with debug keys / Play rejects the upload | android/key.properties missing, or storeFile path wrong |
The storeFile path is relative to android/app/. Place the .jks at android/app/upload-keystore.jks and use storeFile=upload-keystore.jks. |
Android sdkmanager licences not accepted |
SDK licences never accepted on this machine | Run flutter doctor --android-licenses and accept all. |
| CocoaPods errors during iOS build | Stale or missing pods | cd ios && pod repo update && pod install, then rebuild. |
No signing certificate "iOS Distribution" found |
Distribution certificate not installed in this Mac's Keychain | Enable Automatically manage signing with your Team selected in Xcode, or download and double-click your distribution certificate. |
Version code X has already been used (Play Console) |
Uploading a build with the same or lower build number | Increase the +N build number in pubspec.yaml and rebuild. |
Code Generation (after model changes)
# One-time build
dart run build_runner build --delete-conflicting-outputs

# Watch mode (during development)
dart run build_runner watch --delete-conflicting-outputs
Secure Storage
Auth tokens are stored securely via flutter_secure_storage
(Android Keystore / iOS Keychain) instead of SharedPreferences.
Android
minSdkVersionmust be 23 or higher — already configured inandroid/app/build.gradle.ktsAndroidManifest.xmlsetsandroid:allowBackup="false"andandroid:fullBackupContent="false"to prevent decryption errors after auto-restore
iOS
- iOS deployment target must be 12.0 or higher (already satisfied by the current
Podfile) - The Keychain Sharing capability is enabled via
ios/Runner/Runner.entitlements - If you regenerate the Xcode project, re-add it: Xcode → Runner target → Signing & Capabilities → + Capability → Keychain Sharing
Crash Reporting
The app uses Firebase Crashlytics for crash reporting in production builds.
| Build Mode | Behavior |
|---|---|
| Debug | Errors print to the console (Flutter default). No remote reporting. |
| Release | Uncaught errors are reported to Firebase Crashlytics automatically via FlutterError.onError and PlatformDispatcher.instance.onError in lib/main.dart. |
Setup
- Enable Crashlytics in the Firebase Console for the project configured by
flutterfire configure - Android symbols are uploaded automatically by the Crashlytics Gradle plugin (already wired in
android/app/build.gradle.kts) - iOS dSYMs upload via the standard Crashlytics run-script build phase in Xcode
- When building with
--obfuscate --split-debug-info, upload the symbols to Firebase for deobfuscated crash reports
API Integration
All API endpoints consumed by the app are declared as constants in
lib/config/util/app_constants.dart. The base URL is prepended at runtime by the
core HTTP client in lib/core/data/.
Authentication Flow
POST /api/v1/customer/auth/check-user-exists  ← Check if user exists
POST /api/v1/customer/auth/login              ← Email/phone + password
POST /api/v1/customer/auth/send-login-otp     ← Request login OTP
POST /api/v1/customer/auth/verify-login-otp   ← Verify OTP → returns JWT
POST /api/v1/customer/auth/forgot-password     ← Initiate password reset
POST /api/v1/customer/auth/verify-otp          ← Verify reset OTP
POST /api/v1/customer/auth/reset-password      ← Set new password
POST /api/v1/customer/auth/google             ← Google ID token
POST /api/v1/customer/auth/facebook           ← Facebook access token
POST /api/v1/customer/auth/apple              ← Apple identity token
POST /api/v1/customer/auth/refresh            ← Refresh JWT
POST /api/v1/customer/auth/logout
Request Headers
Authorization: Bearer {jwt_token}
Accept: application/json
Content-Type: application/json
X-localization: en         ← Current language code (en, ar, hi, es, bn)
Core Endpoints Summary
| Feature | Base Path |
|---|---|
| App Config / Home Screen | /api/v1/customer/app-screen/* |
| Products | /api/v1/customer/items |
| Categories | /api/v1/customer/categories |
| Cart | /api/v1/customer/cart |
| Checkout / Place Order | /api/v1/customer/checkout/* |
| Coupons | /api/v1/customer/coupons |
| Orders | /api/v1/customer/orders |
| Wallet | /api/v1/customer/wallet/* |
| Loyalty Points | /api/v1/customer/loyalty-points/* |
| Notifications | /api/v1/customer/notifications |
| Chat | /api/v1/customer/chats |
| Profile | /api/v1/customer/profile |
| Addresses | /api/v1/customer/addresses |
| Wishlist | /api/v1/customer/wishlist |
| Reviews | /api/v1/customer/reviews |
| Refund Requests | /api/v1/customer/refund-requests |
| Brands (Popular) | /api/v1/customer/brands/popular |
| Labels | /api/v1/customer/labels |
| Common Conditions | /api/v1/customer/common-conditions |
| Flash Sales | /api/v1/customer/flash-sales |
| Special Offers | /api/v1/customer/app-screen/special-offer |
| FAQ & Categories | /api/v1/customer/faqs, .../faqs/categories |
| Item Content | /api/v1/customer/app-screen/item-content |
Troubleshooting
Build Runner Conflicts
dart run build_runner clean
dart run build_runner build --delete-conflicting-outputs
Gradle Build Failures (Android)
- Run
flutter clean && flutter pub getand try again - Ensure
JAVA_HOMEpoints to JDK 17 - Check that
google-services.jsonis present inandroid/app/ - Invalidate Android Studio caches: File → Invalidate Caches
CocoaPods Issues (iOS)
cd ios
pod deintegrate
pod install --repo-update
cd ..
flutter build ios
Google Maps Not Showing
- Verify the API key in
secrets.xml(Android) andInfo.plist(iOS) - Ensure Maps SDK for Android / iOS is enabled in Google Cloud Console
- Check that billing is enabled on the Google Cloud project
- On Android, check
logcatfor "API key not valid" errors
Push Notifications Not Received
- Verify
google-services.jsonandGoogleService-Info.plistare up to date - Ensure FCM is enabled in your Firebase project
- Check that the FCM Server Key is configured in the Admin Panel under Settings → Firebase Setup
- On iOS, push notifications require a physical device and a valid APNs certificate/key in Firebase
- Test FCM delivery directly from the Firebase Console → Cloud Messaging
Network / API Errors
- Confirm
baseUrlinapp_constants.dartis correct and includes the protocol (https://) - For Android emulator accessing a local server: use
10.0.2.2instead oflocalhost - Verify the backend server is running and accessible from the device's network
- Check for CORS errors on the backend if using a web build
Localization Not Updating
flutter gen-l10n
flutter clean
flutter pub get
facebook_auth Login Fails on iOS
- Ensure
FacebookAppIDand thefb{APP_ID}URL scheme are added toInfo.plist - Enable Facebook Login product in your Facebook App dashboard
- Add your iOS bundle ID to the Facebook App's settings
General Reset
flutter clean
flutter pub get
dart run build_runner build --delete-conflicting-outputs
flutter gen-l10n
flutter run
FAQ & Environment-Specific Issues
Common environment-specific hurdles when setting up and building the Flutter app.
API requests time out or fail to connect
- Confirm
baseUrlinapp_constants.dartis correct and starts withhttps://. - Ensure the backend allows connections from the device's network and that any firewall or cloud security group permits inbound traffic on the API port.
- Android emulator reaching a server on your own machine must use
10.0.2.2instead oflocalhost; the iOS simulator can uselocalhost. - Android 9+ and iOS block plaintext HTTP by default — always serve the API over HTTPS.
Gradle / Android build fails on a fresh machine
- Point
JAVA_HOMEat JDK 17 — newer or older JDKs commonly break the Android Gradle Plugin. - Run
flutter clean && flutter pub get, then rebuild. - Behind a proxy or firewall, Gradle may fail to download dependencies — configure your proxy
in
~/.gradle/gradle.properties.
CocoaPods / iOS build fails
cd ios
pod repo update
pod install --repo-update
cd ..
flutter build ios
On Apple Silicon, if pods fail to install, retry under Rosetta:
arch -x86_64 pod install.
build_runner or code generation errors
dart run build_runner clean
dart run build_runner build --delete-conflicting-outputs
flutter gen-l10n
Firebase / Google Maps features do nothing at runtime
- Verify
google-services.json(Android) andGoogleService-Info.plist(iOS) are present and match your Firebase project. - Ensure the required Google Cloud APIs are enabled and that billing is active on the project — maps render blank without it.
- Confirm the bundle ID / package name registered in Firebase and Google Cloud matches the app.
Customization
App Theme & Colors
The global theme is defined in lib/config/theme/. Update color seeds,
typography, and component themes there. All UI components reference the theme via
Flutter's Theme.of(context) — changes propagate automatically.
App Icon
# Replace the source image:
# android: android/app/src/main/res/mipmap-*/ic_launcher.png
# ios: ios/Runner/Assets.xcassets/AppIcon.appiconset/

# Or use flutter_launcher_icons package:
dart pub global activate flutter_launcher_icons
flutter_launcher_icons
Splash Screen
Update the native splash assets:
- Android:
android/app/src/main/res/drawable/launch_background.xml - iOS:
ios/Runner/Assets.xcassets/LaunchImage.imageset/ - Or use the
flutter_native_splashpackage for a code-driven approach
Adding a New Feature
-
Create the feature folder under
lib/features/<feature_name>/withdata/,domain/, andpresentation/sub-directories. -
Define Freezed models in
data/model/and rundart run build_runner build. -
Create the BLoC/Cubit in
presentation/bloc/and register it with GetIt using the@injectableannotation. -
Add routes in
lib/config/route/route_config.dart.
Updating Lottie Animations
Replace or add .json files in assets/json/.
Reference them via the generated Assets class in lib/config/util/assets.gen.dart
(regenerated automatically by flutter_gen on next build).
Need help? Reach us via the item’s Support tab on CodeCanyon or dayonesoft.com or visit our website for support.